
Main Courses
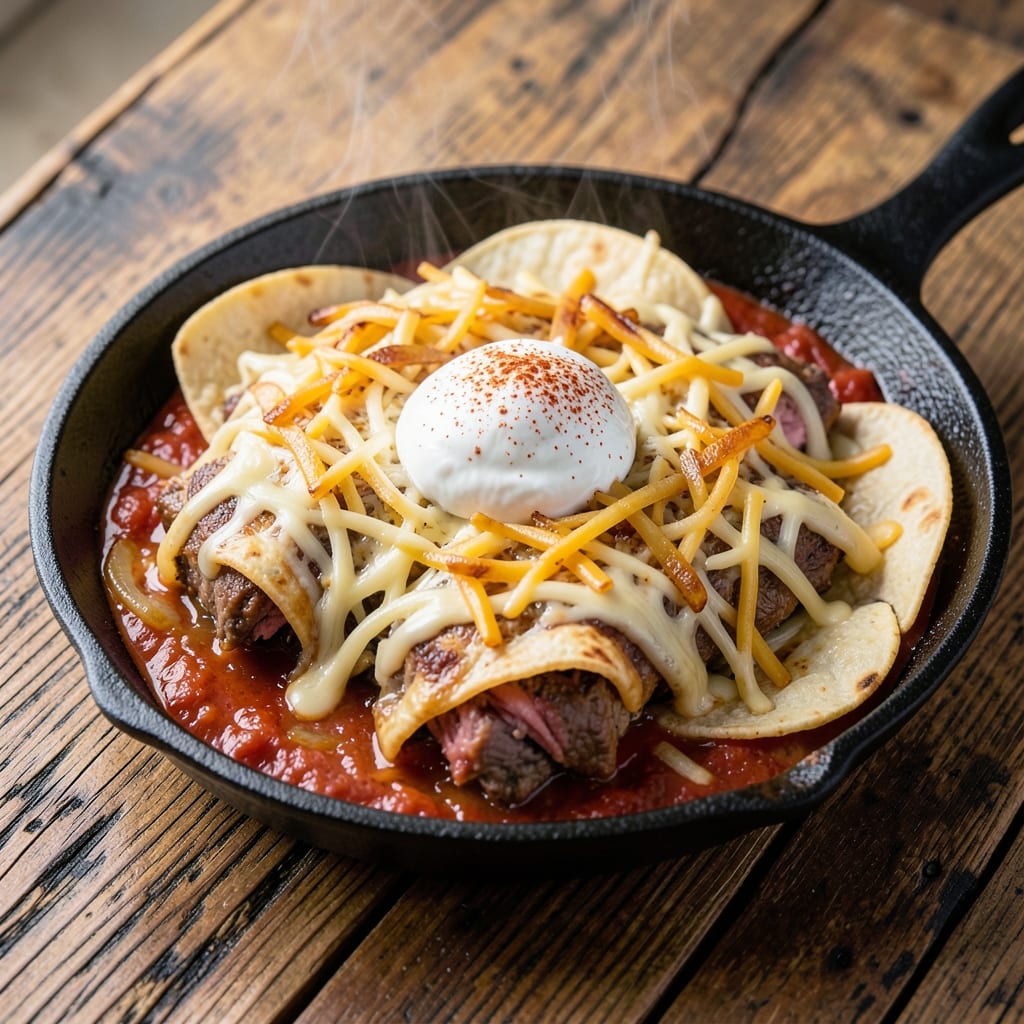
This loaded beef enchilada recipe delivers restaurant-quality comfort food with cheese-stuffed crunch and layers of smoky, savory depth. 🔥 After years of perfecting the balance between tender beef, melty cheese, and crispy tortillas, I've created a version that's impossible to resist. The secret lies in slow-cooked beef that practically falls apart, combined with tortillas filled to the brim with cheese for that irresistible crunch.
What sets these enchiladas apart is the two-step baking process—first toasting the tortillas for structure, then baking until the cheese is bubbling and golden. I use a simple but flavorful beef mixture that's braised until tender, then mixed with spices that develop deep, complex flavors. The result is a dish that's hearty enough for a family dinner but easy enough for a weeknight.
By the time these enchiladas emerge from the oven, you'll have perfectly baked tortillas with melted cheese oozing at every bite, all topped with your favorite traditional accompaniments. The combination of smoky beef, crispy cheese edges, and creamy sauce creates a texture and flavor experience that's hard to beat. This recipe serves 6 and comes together in about 45 minutes of active time, with most of the work happening while you're baking.
Serve with all the classic toppings—sour cream, guacamole, sliced jalapeños, and fresh cilantro—to let everyone customize their plate. The leftovers reheat beautifully, making this an excellent meal prep option for busy weeks. Let's get cooking!
Ingredients for loaded beef enchilada
Sixteen ingredients for a dish that tastes like a hug from your favorite Mexican restaurant.
| Ingredient | Amount | Notes |
|---|---|---|
| Chuck Roast 🥩 | 2 lb | Pre-cubed for even cooking |
| Flour Tortillas 🌯 | 12 whole | Medium or large size, 8-inch |
| Shredded Monterey Jack Cheese 🧀 | 3 cups | Freshly shredded preferred |
| Shredded Cheddar Cheese 🧀 | 2 cups | Sharp cheddar for best flavor |
| Red Enchilada Sauce 🍅 | 2 ½ cups | Homemade or quality jarred |
| Yellow Onion 🧅 | 1 whole | Diced, about 1 cup |
| Garlic Cloves 🧄 | 4 cloves | Minced, for beef mixture |
| Ground Cumin 🌿 | 1 tbsp | Toasted for deeper flavor |
| Chili Powder 🌶️ | 2 tbsp | Medium heat preferred |
| Smoked Paprika 🌶️ | 1 tbsp | For smoky depth |
| Salt 🧂 | 1 ½ tsp | Diamond Crystal preferred |
| Black Pepper 🌶️ | ½ tsp | Freshly ground preferred |
| Beef Broth 💧 | 1 ½ cups | Low-sodium preferred |
| Sour Cream 🥛 | ½ cup | Full-fat for creaminess |
The chuck roast is non-negotiable here—it's the only cut that gives you that fall-apart tenderness. Costco or Walmart usually have it pre-cubed, which saves time, but if you're buying whole, look for good marbling. The tortillas? Mission or La Tortilla Factory are my go-tos—they toast perfectly and hold up to all that cheese. For the cheese, freshly shredded makes a world of difference—pre-shredded gets clumpy and doesn't melt as nicely. If you're in a pinch, Trader Joe's sells bags of freshly shredded that keep for weeks in the freezer.
No chili powder? Substitute with 1 tbsp cumin plus 1 tbsp smoked paprika—it's what I do when I forget to shop. The beef broth can be swapped for water if you're in a bind, but add 1 tbsp soy sauce for umami depth. For the onions, you can absolutely use frozen diced—no one will know. The tortillas should be toasted in a dry skillet for about 20 seconds per side before filling—this prevents sogginess and gives that perfect crisp. And if you're worried about the cheese being too much, trust me on this—it's what makes these enchiladas legendary.
The beef mixture keeps for 3 days in the fridge, so make extra and use it for tacos or quesadillas. The assembled enchiladas can be refrigerated for 2 days before baking—just add 5-10 minutes to the baking time. For freezing, assemble the enchiladas, cover tightly with foil, and freeze for up to 3 months. Thaw overnight in the fridge before baking. Pro tip: I always make a double batch and freeze half—weeknight dinners sorted.
Why You'll Love This Recipe
- Slow-Cooker Shortcut: I swear by the chuck roast here—it’s tender after hours in the slow cooker with just salt, pepper, and a splash of beef broth. No chopping, no fuss, and the leftovers? Even better the next day.
- Melty Cheese Overload: That double cheese combo—Monterey Jack and cheddar—is where it gets real. The Jack melts smooth, the cheddar adds a sharp bite, and when it crispy on top? You’ll want to eat it straight from the pan.
- Game for Any Night: Between us, this feeds six but costs less than takeout. I’ve served it at game nights (because it’s hearty), lazy Sundays (because it’s easy), and even as a breakfast-for-dinner hack (yes, really—just add eggs).
- Leftovers That Don’t Suck: Honestly, the first batch is good. The second? Better. The sauce soaks in overnight, the beef stays juicy, and I’ve reheated portions in the microwave or oven—no dry, sad enchiladas here. Budget win, too.
Step-by-step instructions for loaded beef enchiladas
Here's how to build these hearty enchiladas with tender beef, melty cheese layers, and smoky depth.
🔥 Step 1: Brown the Chuck Roast for Deep Flavor
Heat a large Dutch oven over medium-high heat and add the 2 lb chuck roast in one layer. Let it sear undisturbed for 5 minutes until a deep brown crust forms. This step is non-negotiable—it develops the rich, meaty flavor that carries through the entire dish.
Once browned on one side, flip the beef chunks and cook for another 3-4 minutes until they release easily from the pan. Real talk: if you skip this, your enchiladas will taste bland. Transfer the beef to a plate and set aside.
🍳 Step 2: Build the Smoky Beef Mixture
In the same Dutch oven, add the diced yellow onion and cook for 5 minutes until softened. Add the 4 minced garlic cloves and stir for 30 seconds until fragrant. This is where the aromatics get to shine—don't rush it.
Return the beef to the pot along with the 1 tbsp ground cumin, 2 tbsp chili powder, 1 tbsp smoked paprika, 1.5 tsp salt, and 0.5 tsp black pepper. Pour in the 1.5 cups beef broth and bring to a simmer. Cover and cook for 1 hour until the beef is fork-tender and the sauce has thickened slightly. You want it to coat the back of a spoon.
👨🍳 Step 3: Prepare the Cheese-Stuffed Tortillas
Preheat your oven to 375°F. Warm the 12 whole flour tortillas by dipping them in hot water for 10 seconds per side and then laying them on a clean towel. This makes them pliable enough to handle without cracking.
Here's the thing—this is where the magic happens. Take each tortilla and spread 2 tablespoons of the beef mixture along one half. Sprinkle with 1 tablespoon of the shredded Monterey Jack cheese and 1 tablespoon of the shredded cheddar cheese, then roll tightly into a cylinder. Place seam-side down in a greased 9x13-inch baking dish.
🥘 Step 4: Assemble and Bake the Enchiladas
Spread 1 cup of the red enchilada sauce evenly over the rolled enchiladas. Top with the remaining 2 cups Monterey Jack cheese and 1 cup cheddar cheese, then pour the remaining 1.5 cups enchilada sauce over the top. This layering ensures every bite has that perfect balance of sauce and cheese.
Bake uncovered for 25 minutes until the cheese is bubbly and golden. The edges should be slightly crispy, and the tortillas should be tender but not soggy. If the sauce looks too thin, cover with foil for the last 5 minutes to prevent over-browning.
🍽️ Step 5: Finish with Sour Cream and Serve
Let the enchiladas rest for 5 minutes after baking—this helps them set and makes slicing easier. Top each serving with a dollop of 0.5 cup sour cream (about 1 tablespoon per enchilada) and serve immediately. The contrast of cool sour cream against the warm, cheesy filling is what makes these enchiladas irresistible.
I know it seems like a lot of steps, but trust me—each one builds on the last to create enchiladas that are packed with flavor, texture, and that perfect smoky depth. And the best part? Leftovers reheat beautifully, so you'll have delicious meals ready for days to come.
Pro Tips For Making Loaded Beef Enchilada
- Sear the Chuck First: I learned this the hard way—skipping the sear means bland, stringy beef. Pat that roast dry, crank the heat to medium-high, and let it develop a deep crust for 3-4 minutes per side before slow-cooking. The Maillard reaction here is non-negotiable for flavor.
- Warm Tortillas Properly: Cold tortillas turn brittle and snap when rolled. Stack them, cover with a damp towel, and microwave for 20-30 seconds—just until pliable. If you’re lazy like me, a dry tortilla will still work, but the edges won’t hold as cleanly when you roll.
- Layer Cheese Strategically: Don’t just dump cheese on top—sprinkle half between the tortilla and beef, then fold the edges before adding the rest. This guarantees every bite has melty goodness, not just a sad, cheesy crust. (Yes, even if it looks like overkill.)
- Sauce in Stages: Pour a thin layer of enchilada sauce in the baking dish first, then add the enchiladas. After baking, drizzle the remaining sauce on top—this prevents soggy bottoms while keeping the cheese from getting waterlogged. Trust me, your enchiladas will stay crispier this way.
Pro cooking tips for great loaded beef enchilada
Cheese-Stuffed Magic
Here's my secret to those irresistible crispy cheese edges: stuff each tortilla with 1 tablespoon of both Monterey Jack and sharp cheddar before rolling. The key is to press the cheese firmly into the tortilla so it melts outward during baking, creating that golden, crunchy crust. I like to use a small ice cream scoop for even distribution—it makes assembly faster and more consistent. 🧀
Tortilla Prep Matters
Never skip warming your tortillas! Dip them in hot water for 10 seconds per side, then lay them on a clean kitchen towel to dry slightly. This makes them pliant enough to handle without cracking when you add the beef and cheese. I've tried skipping this step, and trust me—it leads to broken tortillas and messy fillings. For extra insurance, I keep a damp paper towel nearby to gently press any stubborn folds into place.
Beef Browning Technique
The 5-minute sear on your chuck roast isn't just for flavor—it's about developing the Maillard reaction that creates deep, meaty complexity. Use a heavy Dutch oven (like Lodge) and don't move the beef for those first 5 minutes. If your pan isn't hot enough, the beef will steam instead of brown. I test doneness by pressing a piece with tongs—it should release easily when tender. 🔥
Sauce Layering Strategy
Spread 1 cup of enchilada sauce on the bottom of your baking dish before adding the enchiladas, then top with cheese and the remaining sauce. This creates a moisture barrier that prevents the tortillas from drying out while ensuring every bite has sauce. For extra richness, I stir 1 tablespoon of butter into the sauce before pouring it over the top in the final step.
Baking Time Hacks
Your oven's hot spots will affect baking—rotate the dish halfway through for even browning. If the cheese isn't melting enough after 25 minutes, tent with foil and bake 5 more minutes at 350°F. For a restaurant-style finish, broil for 1-2 minutes at the end—just watch like a hawk to avoid burning. I always set a timer because that broil can turn golden fast! ⏰
Weeknight Shortcut
Make the beef mixture ahead of time—it actually tastes better after sitting overnight as the flavors meld. Store it in an airtight container in the fridge for up to 3 days. When ready to assemble, simply reheat the beef in a skillet with 1 tablespoon of broth to loosen the sauce. This cuts your active cooking time by 30 minutes on busy nights. Honestly, it's my go-to strategy for weeknight dinners. 💡
Nutrition facts
Frequently asked questions
Can I use ground beef instead of chuck roast?
For a quicker version, use 1.5 lbs ground beef (80/20 blend works best). Brown it with the onions and garlic, then drain excess fat before adding spices and broth. The texture will be slightly different but still delicious—just reduce the simmering time to 20 minutes instead of 1 hour.
How do I prevent soggy tortillas?
Toast your tortillas in a dry skillet for 10-15 seconds per side before filling, or dip in hot water for 10 seconds per side then dry on a towel. The key is to assemble the enchiladas, then bake immediately—don't let them sit before going in the oven. If using pre-made sauce, spread it on the bottom of the dish first to create a moisture barrier.
What's the best way to reheat leftovers?
Cover with foil and reheat at 350°F for 15-20 minutes until warmed through. For extra crispiness, broil for 2-3 minutes at the end. Microwaving works in a pinch (wrap in a damp paper towel for 1 minute at 50% power), but oven reheating preserves texture best. Leftovers keep for 3 days in the fridge.
Can I make these vegetarian?
Yes! Swap the beef for 1.5 lbs portobello mushrooms (sautéed with spices) or 1 can black beans (mashed with cumin, garlic powder, and smoked paprika). Use the same baking instructions, but reduce the baking time by 5 minutes since vegetarian fillings cook faster. The cheese layers will still be perfect!
Why did my cheese not melt properly?
This usually happens when the oven isn't hot enough or the sauce is too thin. Make sure your oven reaches 375°F (use an oven thermometer if needed). For extra meltiness, sprinkle cheese directly on the enchiladas before baking, then add sauce on top. If the sauce is too runny, mix 1 tablespoon cornstarch with cold water and stir it in before pouring.